Showing posts with label Christmas. Show all posts

Lil Christmas Tree {DIY}

Preparations for Christmas this year seem to be extremely slow going...as in we got a tree yesterday but haven't decorated it at all yet. Thankfully my 5 year old is on top of watering the tree...

I decided to give this little tree to the kids, so they can enjoy the extra light at night, and to feel the magic all up close + personal, and hopefully to leave our actual tree alone. 

Kid's Tree with Burlap Covered Wooden Base

The problem is that the tree had a tiny little plastic base. The tree kept toppling over every time you so much as look at it! This morning I sprinted (literally, the garage is that cold!) into my scrap wood pile and made a little wood base. I cut some burlap to be slightly larger than the piece of wood, and hot glued the burlap to the board, and then added some fun pom pom trim. I hot glued the plastic base onto the center of the burlap covered board. It took about 5 minutes to finish, and will help to keep my kids from getting frustrated because the tree doesn't stay up on it's own!

As a side note, earlier last week, we moved our little guy to move into the room of his big brother. We hope this doesn't backfire on us, and really we have the room for them to have their own space, but I like the idea of them having to share...to tolerate someone else being in close proximity. Maybe I feel like life is a little too easy for them (I mean, as it should be for 5 + 2 year olds) but I want them to share. 


While bedtime is taking a little longer... we hear the giggles and laughter and find it hard not to laugh ourselves. It's hysterical to hear when the older one falls asleep and the little guy is yelling for his big brother but getting no response. 

I left them last night (for the first of 25 visits until they were both sleeping) and the little guy was sitting up mesmerized by the lights. It was cute. 


Facebook Comments Plugin Bloggerized by BloggerTricks.Biz

Christmas countdown

You can never have too many Christmas countdowns, am I right? 


I pulled together this little guy last weekend using materials I had around the house and a $1.50 mini clipboard. 

I printed out the numbers (although using chalk could work!) onto cardstock and trimmed them down. 

The clipboard was painted on the top side with chalkboard paint. I added some gold glitter to the edge of the the clipboard. I added cute scrapbook paper onto the back using mod podge. And wrapped a ribbon around the middle to finish it off...

I used a chalk marker to write on the design. I first printed the design and traced it using a ball point pen onto the clipboard. 


Facebook Comments Plugin Bloggerized by BloggerTricks.Biz

Holiday Recap & Handmade Gift Preview {yoga bag}

As I had mentioned yesterday, my family took advantage of Christmas & New Years falling on Tuesdays allowing my hubs to take off three days vacation and actually have almost 2 weeks off. {What a gift to have him home with us!}

We began the vacation with a trip to New York to visit my parents. One of the highlights was an amazing Christmas day hike (complete with fresh snow) at a nearby park. It was very cold, but a fun activity. 

Here are my parents: 


And my big guy running through the snow:

A rare photo of me (with the baby & my parents):

My eldest hitching a ride from Daddy:

Mason dog's hunting heritage came out, he loved running around (and I loved seeing him so happy!)

It was an amazing day:

The day after Christmas we headed back home...only to be get caught in PA in a huge snowstorm. We ended up stopping after 7 hours in the car (it should have taken us that long to get all the way home) and stayed the night in a hotel, finishing the 3 hours home the following day. We were very happy to be home, and quickly prepared for my husband's parents to arrive. They brought their (10 month old?) puppy Bracey, who enjoyed her first encounter with snow!

Here she is peaking in from our porch as we unwrapped Christmas gifts (late):

I think it might have snowed the entire time my in-laws were here.

Bracey cracked me up with her penchant for the largest sticks...hehe.

Here's my big guy trekking through the snow:

After my in-laws departed, we decided we were a little stir crazy, but it was still snowing, so we decided to check some items off the to do list...my husband worked out, I rearranged & cleaned the basement.

Overall it was a great "vacation" although I prefer my vacations to involve sand, books, & hot weather, I'd safely say this was a good time too...

Before Christmas, I was asked by an old friend to prepare a Christmas present for her, a pink personalized yoga bag. This is what I came up with:

 I felt like this fabric was pink without being juvinile.

Here is the monogram:

Sorry for the awesome iPhone picture...

Seriously cute, right?!

Facebook Comments Plugin Bloggerized by BloggerTricks.Biz

Lead up to the holidays {Christmas Stockings}


Towards the end of 2012, I ended up being comissioned to create quite a few items. Having hosted Thanksgiving this year, I had moved what seemed like half of the contents of my sewing room BACK from the dining room and into the sewing room again. Without fail, I managed to make a HUGE mess of my sewing room between Thanksgiving & Christmas...{#firstworldproblem} 


Truthfully, it was worth it. And it cleaned up relatively quickly. {But I never took an after photo.}

I had pinned this stocking pattern numerous times. Every time I saw it on my Pinterest feed, I knew I had to have these stockings. I finally ordered the Thimble Blossoms Patterns (you can download the PDF directly) and ordered a variety of fabrics on Black Friday {Merry Christmas to ME!}


I started by making the pinwheel pattern for myself. Sorry for the awesome iPhone pictures. 

I decided to make Callum a zig zag stocking, and Cole I just tweeked the pattern a little to create a herringbone pattern (using the same size triangles as the zig zag pattern.) 


Once I finished the first three, I lost steam. I thought my husband would have to wait a year to get a stocking, and then divine intervention happened, and bam, he had this stocking:


My Mother-in-Law suggested this pattern (I believe she called it a St. Louis Star?) I think it was the easiest of all of the stockings and the quickest to go together.

And here are the stockings on the Christmas stocking holders I made last year (and honestly, I probably never shared the pictures of them!) I am thinking I might repaint them next year and take down the glittery letters and put up individual pictures instead?


I'm pleased with how the new stockings turned out. I wish I had taken better pictures before putting them away this year...

Facebook Comments Plugin Bloggerized by BloggerTricks.Biz

The Christmas Spirit

I'm attempting to get into the Christmas spirit. We're holding off on putting up a real tree until the holiday is a little closer, but I began decorating and pulling out the Santas & snowmen. Today it's even flurrying ever so slightly, it IS beginning to feel a little more like Christmas!

Generally, I get completely caught up with gift giving, and not necessarily in a good way: is the gift good enough? can we afford it? is it too big? will they like it? and this year I've added a new stressor: is it made in America? Ultimately, I'm finding that to be the biggest challenge of all.

In the meantime, I've got lots of ideas and of course projects...let's see if time is on my side...

What makes you "in" the Spirit of Christmas? Do you get stressed about gift giving? Am I the only one?
Facebook Comments Plugin Bloggerized by BloggerTricks.Biz

Project: COMPLETE

*If you are my mother, father, mother in law, or father in law, stop reading unless you want a surprise ruined!

After my son freaked out over having his feet painted, I gave up the idea of the Christmas Trees (using his hands) I figured it was a safe bet that it was a lost cause. I did force him to paint his feet, which he cried and ultimately hated, but put up with, and an hour later I DID in fact find him playing with all my bottles of acrylic paint (and yes, I was scared about the potential mess.) But, I think the project turned out pretty nicely.

I ended up painting on little snowman features. They're cute enough if you ask me.


Once everything was dry, I took my original (8 by 10" fabric) and scanned it into my computer. Using Picasa, I added my son's name & Christmas 2010 and then printed out 2 5"x7" copies onto cardstock. I trimmed them down and framed them and I think they turned out pretty darn cute. What do you think!?

I'm thinking that maybe this will be a yearly tradition as a way of tracking how big the snowmen get through the years?! Maybe next year we might even have a few trees?!
Facebook Comments Plugin Bloggerized by BloggerTricks.Biz

A new home for baby Jesus

When my husband and I were first married my brother & sister in law gave us the Willow Tree Nativity set with Jesus, Mary & Joseph. I absolutely love taking out my nativity and setting it up each December. Each year, I intended on adding to the collection, but only ended up adding the Shepard & Animals. I've mentioned (I suppose for a few years now) the prospect of getting the creche, but I felt like for what it was, it was a little expensive and something that could be made....

So, after probably 3 years of talking about it, my husband and I ventured to my favorite store (Lowes) to pick up the supplies so he could make it for me. Ironically, this trip was extremely stressful and I later called my best friend to tell her I could have divorced him right there in the store....We searched high and low for exactly what I wanted, and we just couldn't find it...finally on a random trip down the very last isle in the store, we came across the most feasible option and picked up what we needed. In a few short hours, my husband had used my design to create my vision...I was impressed and glad he had all his fingers after a few near mishaps with the table saw! After a few coats of spray paint, I'm pretty amazed with the results. I think at some later point, I'd like to put some antique glaze over top in hopes of making it look a little less crisp...


I have to add that in a strange twist, (talk about irony) my sister in law ordered me the matching Willow Tree Creche so baby Jesus would have a home....I couldn't believe that the very day we were constructing our own, my sister in law purchased us the real one. Later today I'll be heading to UPS to mail back Baby Jesus' second home, and instead Lauren is ordering me the Three Wisemen (so I will have the entire set!) 
Facebook Comments Plugin Bloggerized by BloggerTricks.Biz

Christmas idea {part 3}

Although I've had quite a few Christmas decorations that I've accumulated over the years (probably 6 bins worth!) I did not have an advent calendar. I'd seen a few cute calendars, but none were exactly what I wanted...so of course, I decided to make my own. Unfortunately, my camera battery died (in both cameras) so I don't have great pictures of the progress, but you'll be able to get the idea...


I started with a fat quarter of fabric my mother in law gave me (maybe a year or two ago) I LOVE LOVE LOVE this fabric, which seems very vintage with children playing in the snow. I have no idea who makes it, I'd buy more if I did...anyway, I figured this would be the perfect project for this fabric I've been holding onto.

Here's how I did it: I decided to use the wording "24 days of peace & joy" and the font "Pea Lovey Dovey" from the Blog Kevin and Amanda. Best of all, they provide a gazillion fonts for free!!! I printed the wording onto freezer paper and then used Pellon Craft Fuse to adhere the fabric. Unfortunately, not all of the letters adhered well (and I sort of burned a little part of the fabric-don't look too closely) so I used some glue that claimed to be okay for fabric to stick down the last few letters. I quilted a stipple (?) pattern although any pattern would work and then added a red binding (after I rounded all the corners using a CD spindle.) I used my sewing machine's "button" setting to sew on 24 red buttons. I also tried to imitate the "Pea Lovey Dovey" writing using a silver sharpie marker on 24 red mini ornaments. My son is a candy hound (who isn't, right?!) so I did not want to use a candy treat because he'd probably wake up at 7am asking for candy....instead, we'll turn the ornament to the number on the respective day. I also sewed on some snow flake buttons I had in my button stash, since this advent calendar wasn't busy enough already!  Much to my dismay, hanging this little sucker was the hardest part. I probably could have played with the clothes pins more, but my math brain wasn't turned on last night....so I used packaging tape and an old chop stick along the top back edge to provide rigidity so it wouldn't bend. I also used packaging tape on the top corners to tape the top two corners down (to avoid movement) I hung this on the door to our garage which we use ALL the time! I don't have any pictures of the back (which I have the cutest plaid fabric! but if you are unsure and want more explanation, let me know and I can take pictures.

This project did take a few hours (maybe 2-3 hours) but I think the work was well worth the time. What do you think?
Facebook Comments Plugin Bloggerized by BloggerTricks.Biz

Christmas Idea {part 2}

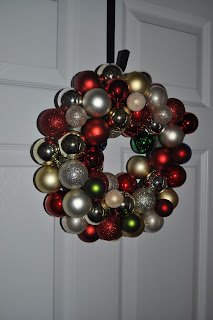
I have noticed these beautiful ornament wreaths all over the place. They are on blogs, in stores, but none were in my house. I decided this year, I had to change that. And I am proud to say that WITH an awake 2 year old, I had this done relatively quickly.

I've seen numerous other blogs (and I want to say the Today Show this morning) that used a wire hanger and just looped the ornaments onto the hanger. I used a foam wreath form and a hot glue gun. In retrospect, I should have wrapped the wreath form with fabric or something to improve the stickiness, but it's been hanging for a few days and knock on wood, everything is holding firm. I also used very small ornaments (from the Dollar Tree) and a few leftover mini ornaments that I had used in another project. Overall I think this used a lot more ornaments (I want to say I started with 12, hahah!) I think I used at least 30 or more.


Cute, right?!
Facebook Comments Plugin Bloggerized by BloggerTricks.Biz

Christmas crafts

I've been quite the little elf these first few days of December. Of course I always have these great big ideas and then either end up kicking myself because I've made it overly complicated for myself OR putting them on the back burner in hopes I'll do it for next year...

This year I decided to change things and actually complete the projects I've been wanting to work on. How novel!

We purchased our Christmas tree last weekend and have it decorated. We put it in a semi-unconventional location (our upstairs landing leading to the bedrooms) I just didn't want it to be too tempting for our two year old to mess with (so far, so good!) It just seemed very lonely. We have a metal railing and I thought some kind of garland/bunting would be necessary...

I had a "Cyber Monday" in store coupon at Michaels so I picked up a few things for the garland. I wanted it simple, with a little color but not too much pazzazz (I didn't want my tree to be over-shined!)


I need to take a few pictures of it up close. I made this out of a roll of burlap that is maybe 6" wide, I have some lights behind the burlap and at each of the main railings I added either a cinnamon/bell tieback OR three mini-ornaments. It came out nicely and although this picture doesn't do it justice, it does jazz up the tree area...
Facebook Comments Plugin Bloggerized by BloggerTricks.Biz

The Holidays--Christmas Postcards--why not?!

I feel like I walk a (very) fine line between loving the holidays and hating them. I love the traditions, receiving gifts, being with family, and of course the food. I hate the shopping, the pressure of coming up with the perfect gift, and the stress in general.

For some reason, I like to have my Christmas cards out BY December 1st (but usually the day after Thanksgiving is preferable.) I'm not sure if I just like being the first Christmas card in my loved one's mailbox or if I just like having that ONE task checked off my list...but it's neurotic. I realize that.

And here I am, in a panic, because I need to MAKE my Christmas card so I can send it out in 15 days. Ahhh! I intended on taking my son out in a cute outfit over the weekend to a picturesque WV locale (of which I'm not really sure where), but alas, the weather did NOT cooperate. It's been rainy, cold & very overcast for a few days now....so no photos for our family.

At first,  I had great big plans (I'll order the remote for our camera so we can set it up in a tripod and take the picture ourselves---because that's what we really need to do--right?!) I suppose I've changed my expectations because today I settled for ironing a clean white sheet (people don't normally do that, right?) and using a very scientific system of rope, knots, and clothes pins, and managed to hang my backdrop from our landing....I was able to get a few pictures of my son & both dogs, even one of my son RIDING one of the dogs (not normally allowed) but this is a special occasion.

Trekkie, my adopted girl, we love her but she makes us crazy. 
Mason, my firstborn, he is truly a piece of work, but as much as we put up with him....I suppose this is proof that he puts up with us as well! 

Normally, not allowed, Callum is taking Mason for a quick ride. Mason wonders if this kid is for real. 

I must add, that at one point, I would use preset formats from Shutterfly.com, they are fantastic and if you order early, they are generally on sale. BUT, last year I decided as an attempt to save money I would send a Christmas postcard (less postage, less cost per card, and less paper waste too!) I thought it was a great idea, and I received a wonderful compliment from a dear friend asking where I ordered from last year, but I'm a glutton for punishment. Without spending an arm & a leg, it was expensive to send customized/personalized Christmas postcards (the ones I came across were super cheesy I might add.) SO, last year I spent HOURS and HOURS creating the perfect layout, format, font, photo. The first card I ordered even looked horrible when printed because of an unfortunate blurry photo, but luckily 123print.com, has an amazing return policy, so after some minor tweaks I reordered and was much happier with round 2.

So here I am...starting to sweat it, not loving the pictures but thinking okay I might be able to make this work....but in usual fashion, I'm starting the holiday season in my usual fashion: slightly panicked, beginning to stress, dreading what I have to do...
Facebook Comments Plugin Bloggerized by BloggerTricks.Biz

What's next....

It seems likely lately, everything in life is forcing us to ask ourselves, what's next. And honestly, today, I just want to enjoy right NOW. I don't want to be planning. I don't want to be worried about everything that might happen or might NOT happen. I guess it's just part of being an adult. Like yesterday, my big accomplishment: refinancing our mortgage. I'm so lame.

So, since everything seems to be pointing to the "what's next" I figured I might as well start thinking about Christmas...you know, since Halloween is over (which reminds of a funny story: the other day I was at Walmart, it was the day after Halloween and they were setting up a Christmas tree-blah-and right above the tree was a sign that said "Happy Halloween" and it made me chuckle and think, what's wrong with this picture?!) I've been wanting new Christmas stockings. I did just see that Pottery Barn has stockings on sale with FREE shipping AND Free personalization, BUT, ultimately, over time I just want stockings that all MATCH. I think that's my big hang up, I want stockings that are all the same. And I have two stockings from when my husband & I got married, but not one for my son (or the dogs-gasp!)

At some point I came across these beauties at Ballard Designs. And of course, I love that they are burlap AND that I can make ones that look JUST like that (& won't cost me $34!)

So here's my first attempt:
It's not too bad, although it's looking a little...rough? I'm considering adding piping? Maybe that will help it look more finished. Also I was thinking about somehow carefully stitching along the name "tape" so it doesn't buckle. I'm just  not sure. It just looks a little sad.
 I used upholstery "tape" from JoAnns Fabric. It was super cheap. I then printed our names onto freezer paper and then very carefully cut out our names. The problem is that it was really hard to make our names visible. I first tried using a paint brush and puffy paint (yes, circa 1990) and it was a little blotchy, so I reverted to my new favorite: black spray paint.

 Here's what it looked like after I spray painted. I added extra freezer paper around the original names to avoid overspray. Maybe I HAVE learned!!!
 I cut out 2 burlap stockings & 2 linings (canvas drop cloth of course!)

So, it's not BAD, it's just not GREAT.
Facebook Comments Plugin Bloggerized by BloggerTricks.Biz
Blogging tips