Showing posts with label pillow. Show all posts

Quilted Family Photo Pillow {Sewing}

{If you happen to be my mother in law, avert your eyes, it's likely you may receive this as a gift...}

Earlier this week, my mom celebrated her birthday. Her birthday falls in the beginning of the month and sometimes it sneaks up on me...{I'll just go ahead and blame February for being such a short month!}

This year, about three days before her birthday, I realized I needed to get my act together and send her something special. 

I'd seen this beautiful quilted pillow, and remembered this other beautiful pillow both from Polka Dot Chair, and decided to morph the two pillows into one.


The instructions I used were from the Patchwork Quilted Pillows tutorial, the only difference is that I did not cut the 4 1/2" square prints. Instead I substituted a photo I printed out on printable fabric. I trimmed the fabric down to 9.5" square, but then decided to add a small border. (I had first started with a rectangular photo, and decided it looked funny so I added the small border all around. I think I cut a 1" strip and sewed that around the edges of the photo that was cut to 9"?) 

The printable fabric I used can be found here

Here is the front before I added the quilting. 


To quilt, I simply stitched in the ditch along the photo, along the picture border, and then again along all of the triangles. I then used those lines as guides and used my presser foot as my guide so the stitching is fairly close together.


Using the instructions, I sewed a zipper, and printed a special message to my Mom on the printable fabric, and then used Heat 'n Bond Ultra to iron on that fabric.


And the final part of this project is that I ordered a pillow insert and had it mailed directly to my mom!
Facebook Comments Plugin Bloggerized by BloggerTricks.Biz

pillows, pillows everywhere

I wish I had pillows everywhere, really! I decided to make some new pillows for my sofa, but I guess I didn't realize what an undertaking the pillow process would be. So far I have 3 pillows 99% finished, but the finish line seems so far away....in the meantime, that's what I'm up to...
Facebook Comments Plugin Bloggerized by BloggerTricks.Biz

I have crafting ADD

I'm pretty sure I have crafting attention deficit disorder. I just can't stop myself. Once I get an idea in my head. I just can't stop.

So, I've decided that the pillow's on my sofa & love seat have lived a great life, but they are starting to look a little pathetic. As much as I'd like to just start over and get a new sofa & love seat, I realize I would have to do a lot of convincing for my husband to agree to that....SO, I'm going to settle on some new pillows.

I saw one yesterday at TJMaxx that I fell in love with. And I just couldn't stop thinking about it. Of course is only cost $19.99, but it would not completely solve my problem (I need a lot more pillows!) so I did take a picture.

So, since I have crafting ADD--I had to head to the fabric store this morning. Of course I didn't write any plans down and was going to be guessing what I needed, so $100 later I should be able construct the 8 pillows I need/want. Hopefully I will not have tons of fabric left over (or maybe then I can make some nice matching wreaths and decor?)

After at least 2 hours of sewing this afternoon, I have a very similar pillow just about finished. I can't wait to share it with you!

So this is what I'll be doing the next few days!
Facebook Comments Plugin Bloggerized by BloggerTricks.Biz

Beach Burlap Pillow

I'm so excited to share this creation with you. I'm not kidding when I tell you that it is SUCH a quick project. I've had time to do all of this, plus do two loads of laundry AND finish the last episode of the Real Housewives of DC...

I just put new bedding on my bed. I've just been feeling I need something new to change things up. I get this way at least once  year...but being that we haven't even been in this house 3 months I figured this nagging feeling just wouldn't go away...I'll have to tell you about the new bedding another day because I'm in love with my new burlap pillow!


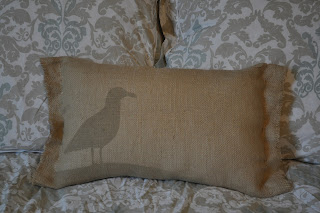
Being that I just returned from a wonderful beach vacation and that I now live in a landlocked state, it make sense that I wanted to have a serene beach/lake feeling in my room, right?!  Using the other half of the Walmart pillow I mentioned in my previous post I created this adorable pillow.

I found an image of a seagull, printed it out onto freezer paper, trimmed the bird away, then ironed the freezer paper to my burlap. I then spray painted the image of the seagull onto the burlap using a tan color only slightly darker than the burlap itself. If I had black I might have tried it, but alas, no black spray paint.
Sorry this picture is side ways, I just didn't flip it before I uploaded it. You get the idea:

The construct the pillow, I simply sewed a seam along the bottom edge of the burlap with my sewing machine. I think jammed the pillow inside, and using a very large needle and some of the burlap I'd pulled off to create a little ragged edge I simply sewed up both sides of the pillow.


Here is a better picture of the seagull:
Facebook Comments Plugin Bloggerized by BloggerTricks.Biz

Easy Button Pillow

My friend Amy absolutely LOVES fall, luckily her birthday falls in mid-September, so I thought it was only fitting to give her a fall themed birthday gift. We've been trying to get away from spending tons of money on each other's birthdays, so I figured I'd try to come up with something easy and "fall" inspired.

I was able to create a simple pillow using buttons from my stash. Don't tell Amy, but this projects probably didn't even cost $5!! AND, I was able to finish the entire thing during ONE long afternoon nap!

I picked a font and printed out just the outline of the "S". I then used a sewing marker that washes off to trace the letter onto my fabric, as you can see from the pictures I ironed the fabric in half to give myself a guideline before tracing. Of course any fabric will do, but I used some remnants of my favorite fabric: drop cloth from Lowes. I stuffed my pillow with half of the cheapest pillow I could find at Walmart ($2.50) I drew a line using a ruler across the long side of the pillow. I think I tried to separate the filling as best as I could and then used a rotary cutter to cut the pillow in half. I then pinned the pillow shut and sewed the seam shut using a zig zag stitch. It does not have to be sewn perfectly (I discovered!) I used the button hole stitch on my machine and I did lay out the buttons beforehand on my printout to make sure they'd look okay.

Before sewing everything together, I used some rope I had on hand (from my dog bed project) that I covered with the same fabric to create a more finished look. I sewed everything together and flipped the pillow right side out. I inserted my cheap-o pillow, if you don't have a pillow fiberfill will do. I just discovered the fiberfill was more expensive to buy...go figure.

I love the way the pillow turned out and can't wait to make one for myself with the other half of that pillow!
Facebook Comments Plugin Bloggerized by BloggerTricks.Biz
Blogging tips